How to Make Custom Homebrew Bubbles Using Simple HB Loader Creator
-Simple HB Loader by Lman
-Any PSP Base Game
-Your homebrew folder with all the files in it (I am using PicoDrive)
-This .txt file -App.db Edit.txt
-QCMA
-Your App.db file from your Ps Vita
-(Optional, but Recommended) Notepad ++
Steps:
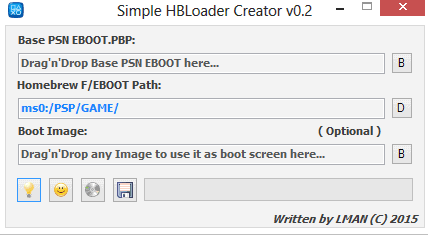
1. Open Simple HB Loader Creator. Drag your base PSN EBOOT.PBP and your Boot Image which is optional.
Put the homebrew path as ms0:/PSP/SAVEDATA/PICODRIVE/EBOOT.PBP . Click on that floppy disk and save it anywhere you want.
2. Rename your homebrew folder as the path you put it as in SimpleHBLoaderCreator (Ex: PICODRIVE)
Now inside that folder put a new folder. Name it anything you want. I am naming it as pico. Place your new EBOOT.PBP file in there.
3. Open that .txt file with Notepad ++. Highlight N64_01234, click Search > Replace, then Replace with your fake game id. (Ex: PICODRIVE) Do the same thing but this time highlight N64 Emulator as the name you want for the homebrew. Now highlight n64 and replace that with the folder inside your homebrew folder (Ex: pico) Next, replace 4,3 with the numbers that you want your bubble to be. To make sure that space isnt taking, open your app.db file go to "tbl_appinfo_icon". Look at your pageId and pos and make sure the number you are going to put in isnt there. (Ex: I am choosing pageId 4 because the pages on 1-3 is taken. Now I am choosing pos 5 because 0-4 is taken. So it is going to be 4,3) Also make sure to change the gameid NPUG80318 with your PSN base game. Now click save and close it.
4. Open your app.db file with DB Browser for SQLite. Click on the Execute SQL tab, then Open SQL file; Click on the .txt file and run it. Now click Write Changes and close the program.
5. Drag the homebrew folder to C:\Users\(Your_PC_Name)\Documents\PS Vita\PSAVEDATA\(Random_ letters_and_#)
6. Launch QCMA or refresh the database if it is already launched. Then, copy the files to the ps vita.
7. Send your modified app.db file to your ps vita Email using Thunderbird. Put the Subject as ur0:shell/db/app.db. Rename app.db to #0 and attach it to the email and send it to yourself.
8. On your Ps Vita open the email app, click on the sent email, tap the attachment which should had shown as a picture. (Do not click OK) Close it by pressing the PS button.
9. Restart your PS Vita and DONE!
Steps For The Look Of The Custom Bubble:
1. Find or make a ICON0.dds and place it inside the folder inside your homebrew folder. (Ex: C:\Users\(Your_PC_Name)\Documents\PS Vita\PSAVEDATA\(Random_Letters_With_#)\PICODRIVE\pico\ICON0.dds)
http://hackinformer.com/2015/02/25/simp ... he-psvita/